Self-Contained Terraria
I was asked to help with a terrariaum protocol for BioCurious and to possibly teach some classes in building terraria. I'd like to contain costs for materials and optimize materials.
9/23/11
I purchased some supplies and started three moss optimizing containers. Each are in 9" X 13" baking pans and this evening I just started by putting in roughly equal amounts of "pillow moss" into the middle of each.
9/24/11
I created some sample environments for trying to encourage moss growth for teaching a terrarium creation class. The thought is that the moss is pricey and maybe I can grow it for the class. I purchased three containers of "pillow moss" as well as orchid mix and peat moss from the East Bay Vivarium. Roughly equal amounts were placed in three different containers, all of which were 9" X 12" baking pans. I placed the moss approximately down the middle of each of the containers and left one side of the container empty and in the other side I placed a handful of peat moss (lighter color) and a handful of orchid mix (darker color). I'm not sure if the pillow moss needs a substrate to survive and thrive, so this will help decide that factor.
I'm trying three different types of baking dishes to see what will work out the best. I'm estimating six terraria could be built from one full container using the pillow moss as the primary substrate.
The first container is Pyrex, purchased from Target for $16.19.
Positives
Pyrex, the brand name in borosilicate labware
Clear, heavy glass
Handles for ease of transportation
Stackability
Negatives
Opaque lid
Price
The second container is Anchor Hocking, purchased from Raley's for $12.99.
Positives
Clear lid
Clear glass
Stackability
Negatives
Cheaper glass
Hideous green color
The third container is Recycled Aluminum Handi-Foil, purchased from Raley's at two for $4.49.
Positives
Price
Clear lid
Negatives
Flimsy
Not stackable
Opaque container
I will have to stack the containers due to space, and this will also be necessary for transportation from my home to the lab. Unfortunately, the Handi-Foil and its lid have already failed under the weight of the other two containers. My plan is to keep the containers on a table under a 12 hour grow light previously purchased from ThinkGeek. This is also under a skylight. I'd like the moss to become darker than originally purchased and I will rotate the containers from bottom to top every week. I will have to monitor color and growth to see if it is feasible to raise a quantity of moss for teaching purposes. It is very easy to overwater terraria, so I sprayed these with tap water and will monitor moisture as well. If the moss is too dry it will crumble when it is put into a terrarium, too wet and it will be too muddy and squishy. I am going to aim for what I have heard is a good moisture level for compost: damp like a wrung out sponge.
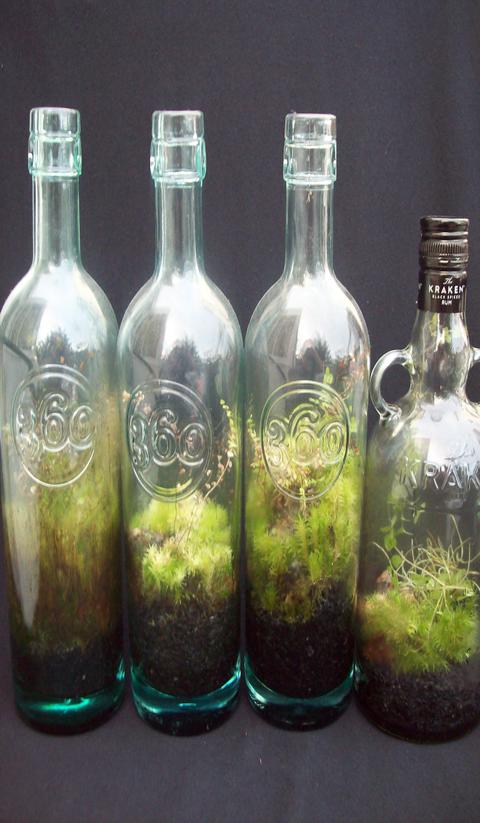
The terraria are to be closed systems, which I've never tried. Here are three examples of my bottle-based, open terraria along with the closed terrarium I built today:
The bottle on the left was my first terrarium. It has been overwatered! I enjoy using old spirits bottles. 360 vodka used recycled glass, and The Kraken Rum makes cool bottles... I like to make purchases based on reusability of containers. I just soak them overnight in the kitchen sink in soapy water then scrape off the labels with a razor blade. I have had a lot of The Kraken bottles saved up for making enclosed ecosystems, so they were perfect for this experiment. Next, I added activated carbon (previously rinsed, dried and stored) to the bottom of five different containers. I wanted to see how each of five different materials would do in enclosed systems.
First was sphagnum moss (from East Bay Vivarium).
Next was Spanish moss (from East Bay Vivarium).
Due to the dry weather, I couldn't find any good moss outside, but I did find this little plant growing as a ground cover between some bricks in a shady area where water had come over from the neighbor's sprinklers.
I also used baby's tears from the dark patio area outside. I've used it in all my terraria to date with good results.
Additionally, I tried a black lichen purchased some time ago, dried, from Flowerland.
It is essential that these aren't overwatered, so I filled them to about 1/2 way up the level of the activated carbon with tap water. I closed the lids and will monitor the growth of each. Like the baking dishes, these are near the artificial light and under the skylight. Due to sometimes rapid growth, I think terraria should start a bit sparse; doesn't look too bad, either.
I'm particularly happy with the colors inside the Spanish moss terrarium. I like how it looked when I first put it in, a little taller and Cthulhu-y, but it squished down a bit. None of these ever work out quite like planned!
This is a mixed-species example I made for myself. I tried trapping some of the baby's tears upside down in the cap by its roots to see how it would affect the vertical growth inside the terrarium. I added three little rocks inside for additional interest.
Lab notebook by Heather Taylor, teachoutside@gmail.com. You are welcome to share all materials with credit to her.


